> ## Documentation Index
> Fetch the complete documentation index at: https://help.micredit.io/llms.txt
> Use this file to discover all available pages before exploring further.
# 欧易Web3钱包交易
> 介绍如何使用欧易Web3钱包交易MICT代币
## 添加\$MICT代币Token
点击钱包币种右侧的功能按钮。
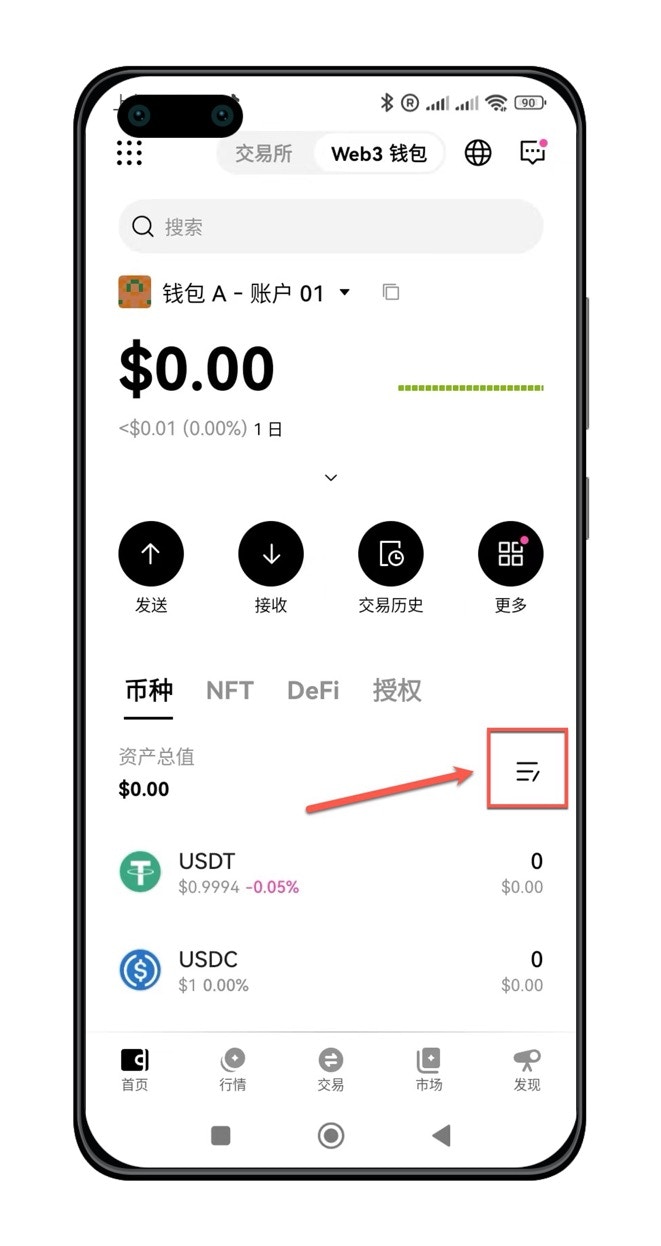 点击"自定义币种"。
选择网络:TON。 Jetton Master输入\$MICT代币的合约地址:`EQDTtusdnxjU7O5qyZyPMNBhxb96cZ69_5x17KaovygF2KLr`。确认后代币名称和精准度会自动补全。
点击"自定义币种"。
选择网络:TON。 Jetton Master输入\$MICT代币的合约地址:`EQDTtusdnxjU7O5qyZyPMNBhxb96cZ69_5x17KaovygF2KLr`。确认后代币名称和精准度会自动补全。
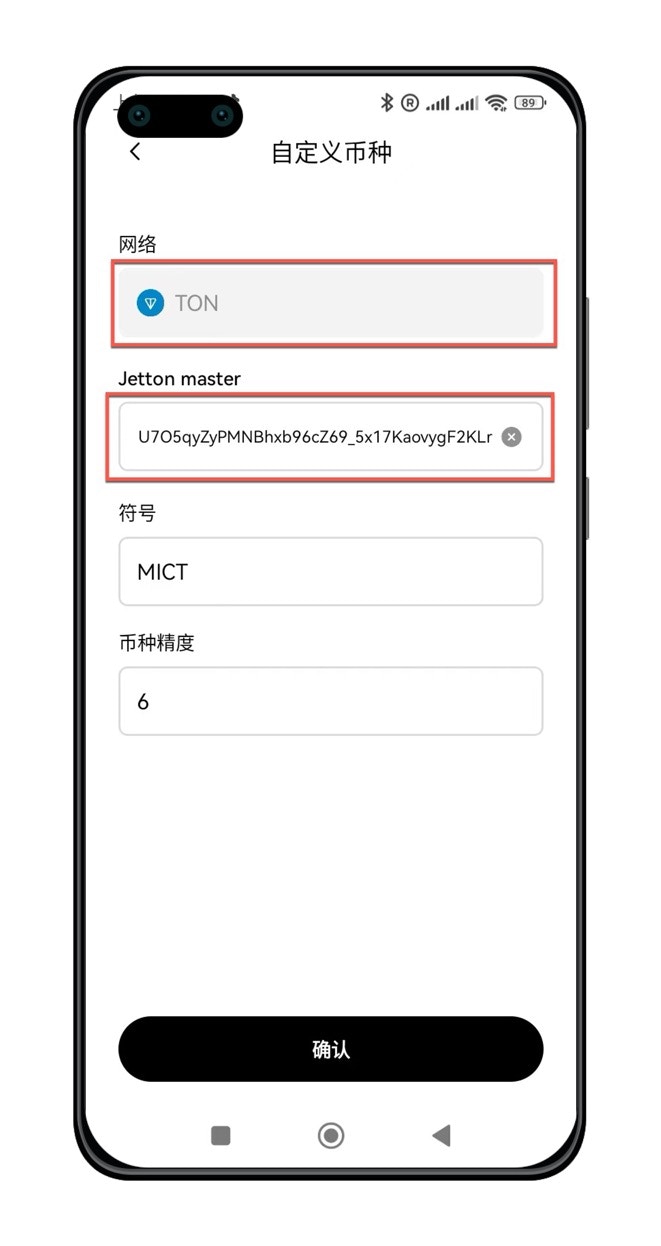 点击`确认`按钮后,就可以看到`$MICT`代币了。
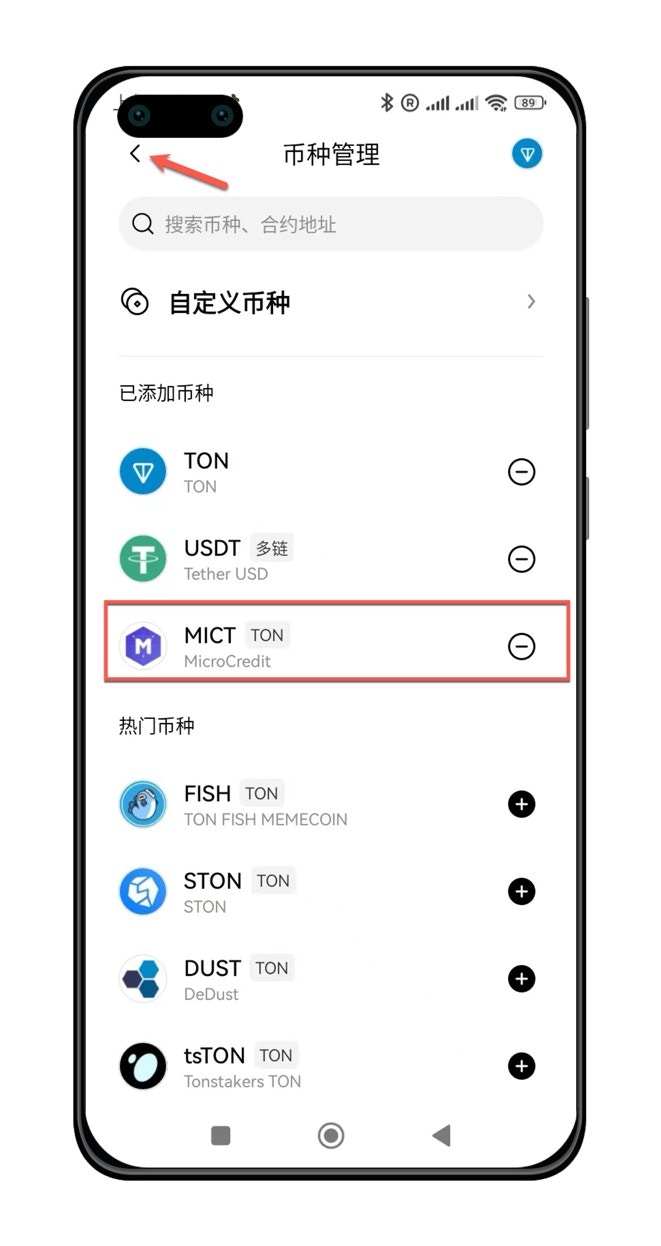 点击返回按钮,回到钱包首页,可有看到MICT的名称和LOGO。
## 接收\$MICT并交易
点击返回按钮,回到钱包首页,可有看到MICT的名称和LOGO。
## 接收\$MICT并交易
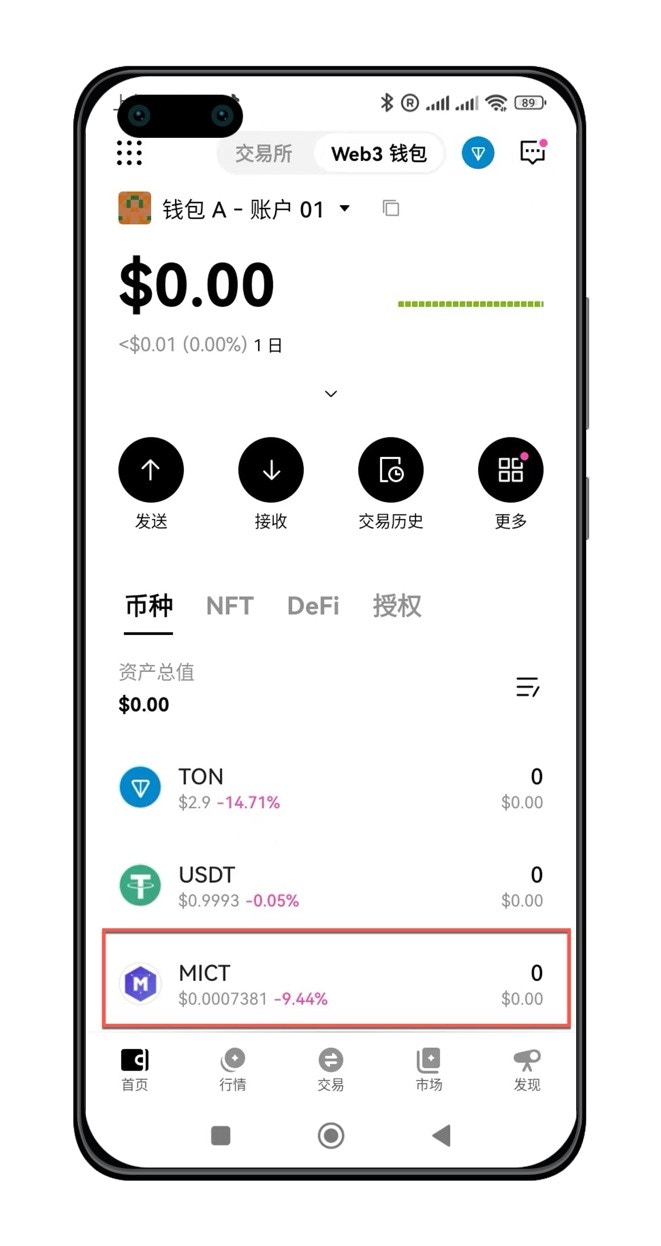 点击MICT代币名称,可进入MICT资产收发界面。
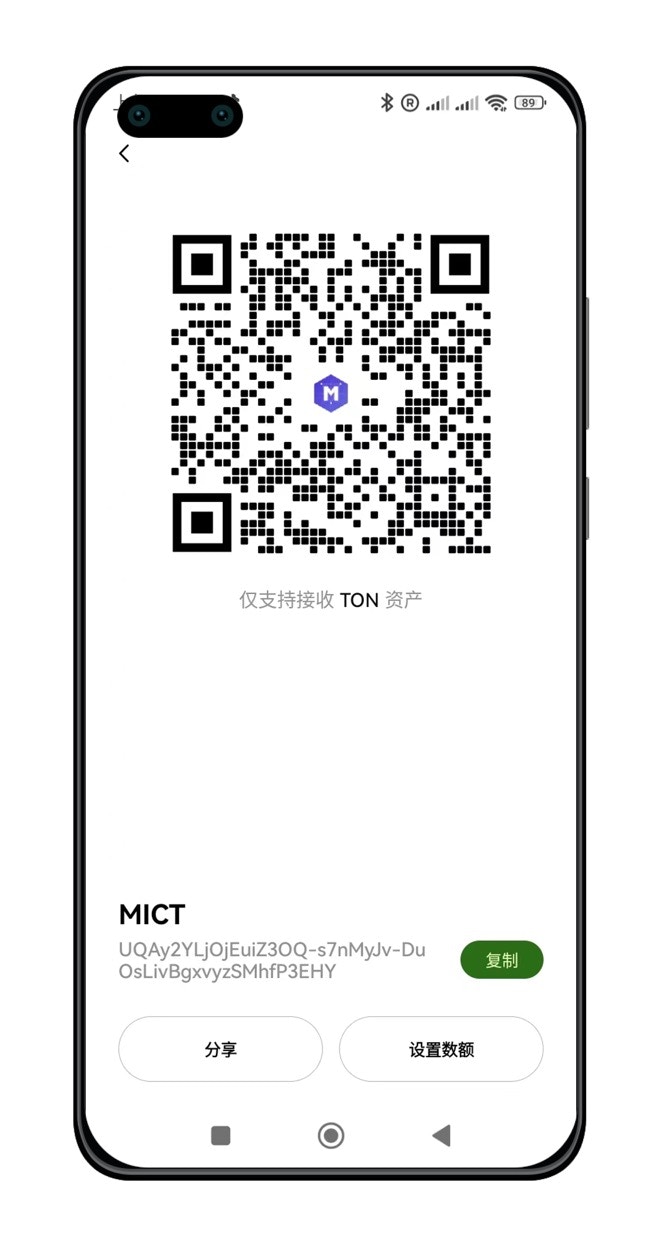
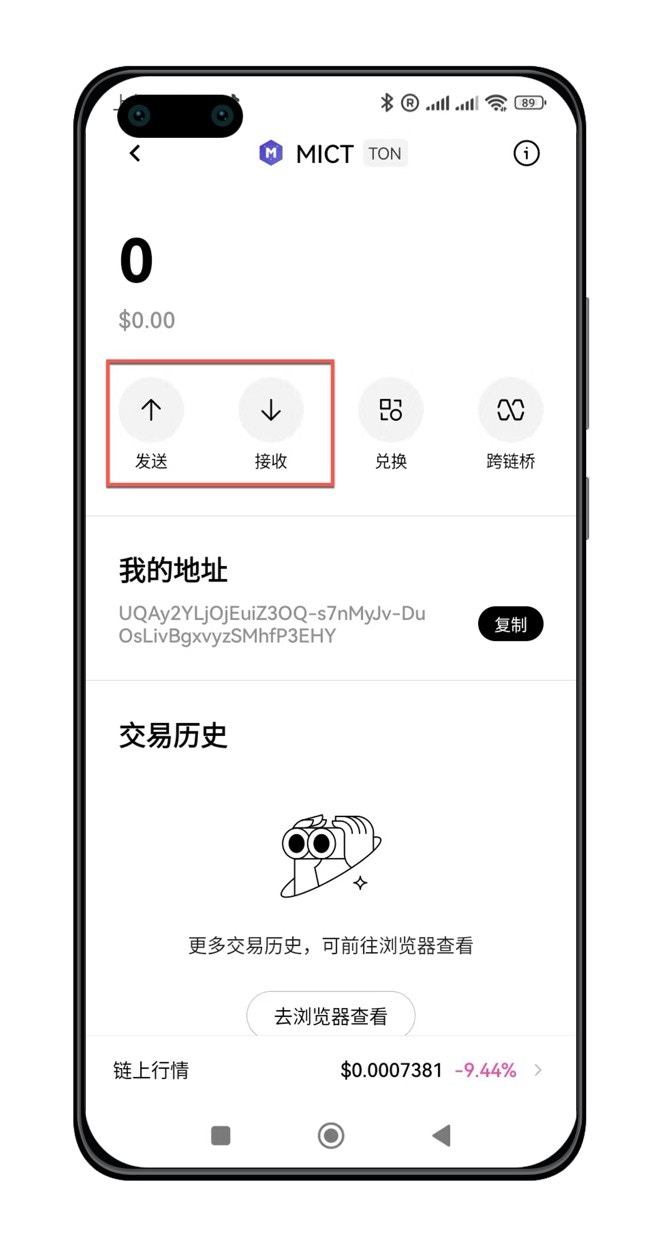 点击`接收`按钮,可以向他人展示自己的钱包地址以及地址二维码。以后,别人让你发钱包地址,就发这里的地址。
 如果有人向你转账`$MICT`,在钱包余额中能看到。
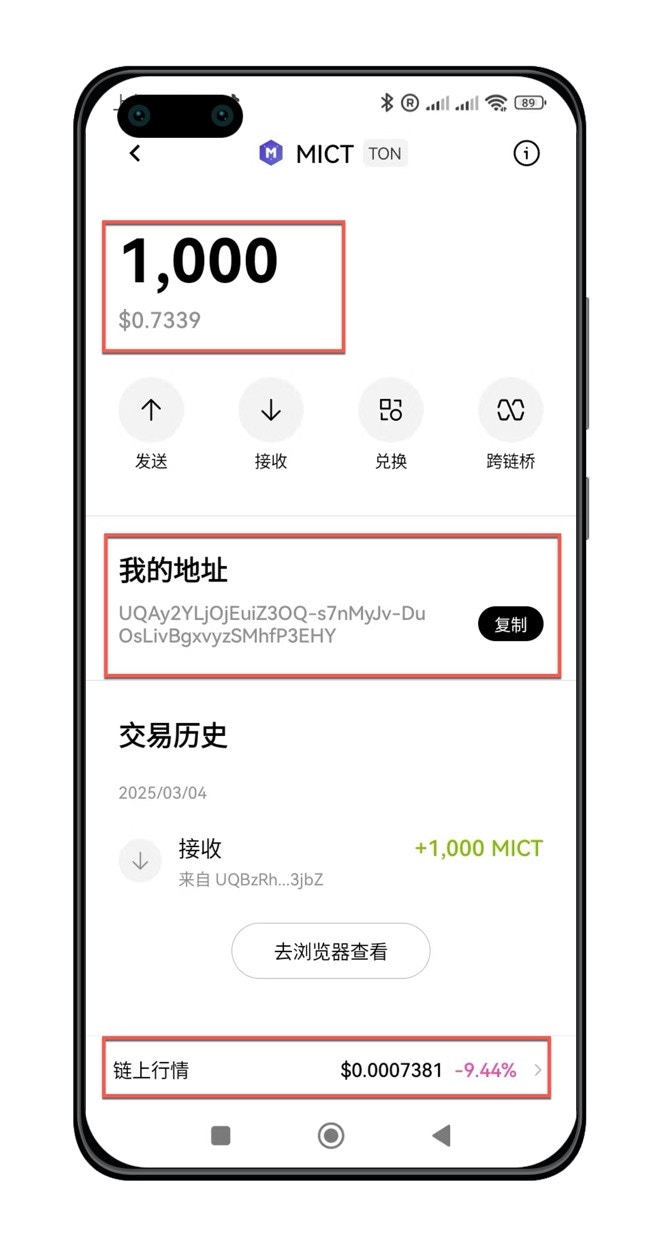 点击链上行情,可以查看币价,并进行交易。推荐点击收藏按钮,方便后续使用。
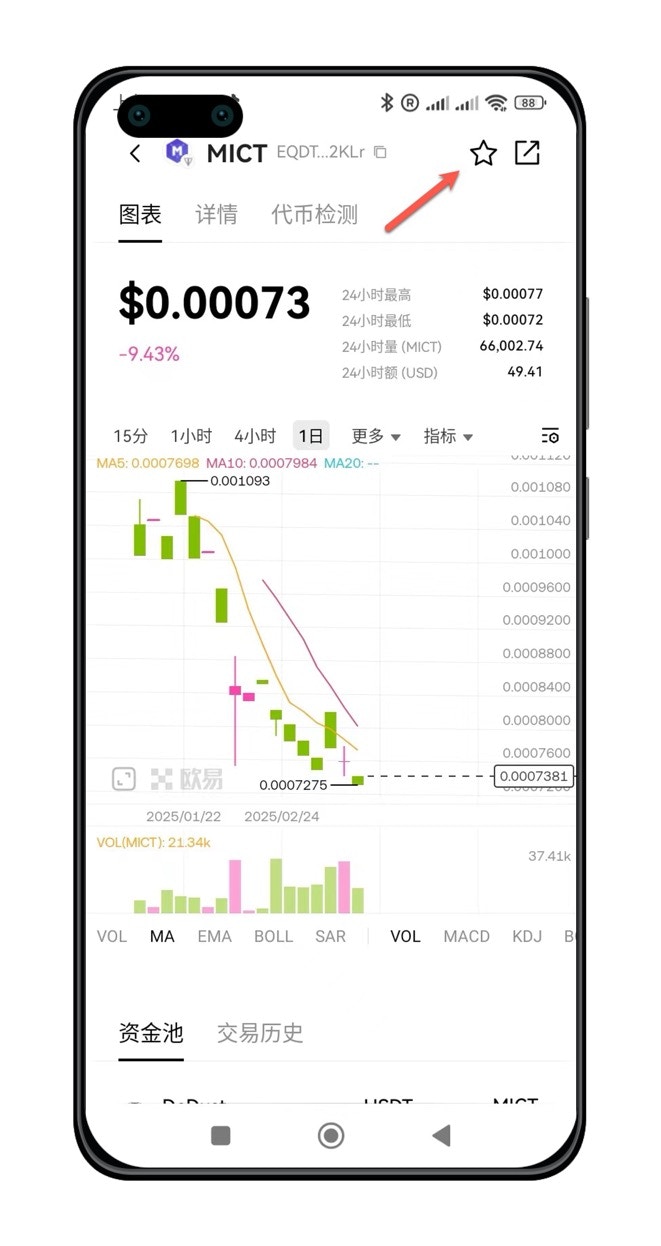 由于MICT是在TON网络上发行的代币,因此买卖MICT之前,您的钱包需要拥有一定的TON作为交易手续费。
## Setup your development
Learn how to update your docs locally and deploy them to the public.
### Edit and preview
During the onboarding process, we created a repository on your Github with
your docs content. You can find this repository on our
[dashboard](https://dashboard.mintlify.com). To clone the repository
locally, follow these
[instructions](https://docs.github.com/en/repositories/creating-and-managing-repositories/cloning-a-repository)
in your terminal.
Previewing helps you make sure your changes look as intended. We built a
command line interface to render these changes locally.
1. Install the
[Mintlify CLI](https://www.npmjs.com/package/mintlify) to preview the
documentation changes locally with this command: `npm i -g mintlify`
2. Run the following command at the root of your documentation (where
`docs.json` is): `mintlify dev`
If you’re currently using the legacy `mint.json` configuration file, please update the Mintlify CLI:
`npm i -g mintlify@latest`
And run the new upgrade command in your docs repository:
`mintlify upgrade`
You should now be using the new `docs.json` configuration file. Feel free to delete the `mint.json` file from your repository.
### Deploy your changes
Our Github app automatically deploys your changes to your docs site, so you
don't need to manage deployments yourself. You can find the link to install on
your [dashboard](https://dashboard.mintlify.com). Once the bot has been
successfully installed, there should be a check mark next to the commit hash
of the repo.
[Commit and push your changes to
Git](https://docs.github.com/en/get-started/using-git/pushing-commits-to-a-remote-repository#about-git-push)
for your changes to update in your docs site. If you push and don't see that
the Github app successfully deployed your changes, you can also manually
update your docs through our [dashboard](https://dashboard.mintlify.com).
## Update your docs
Add content directly in your files with MDX syntax and React components. You can use any of our components, or even build your own.
Add content to your docs with MDX syntax.
Add code directly to your docs with syntax highlighting.
Add images to your docs to make them more engaging.
Add templates to your docs to make them more reusable.
由于MICT是在TON网络上发行的代币,因此买卖MICT之前,您的钱包需要拥有一定的TON作为交易手续费。
## Setup your development
Learn how to update your docs locally and deploy them to the public.
### Edit and preview
During the onboarding process, we created a repository on your Github with
your docs content. You can find this repository on our
[dashboard](https://dashboard.mintlify.com). To clone the repository
locally, follow these
[instructions](https://docs.github.com/en/repositories/creating-and-managing-repositories/cloning-a-repository)
in your terminal.
Previewing helps you make sure your changes look as intended. We built a
command line interface to render these changes locally.
1. Install the
[Mintlify CLI](https://www.npmjs.com/package/mintlify) to preview the
documentation changes locally with this command: `npm i -g mintlify`
2. Run the following command at the root of your documentation (where
`docs.json` is): `mintlify dev`
If you’re currently using the legacy `mint.json` configuration file, please update the Mintlify CLI:
`npm i -g mintlify@latest`
And run the new upgrade command in your docs repository:
`mintlify upgrade`
You should now be using the new `docs.json` configuration file. Feel free to delete the `mint.json` file from your repository.
### Deploy your changes
Our Github app automatically deploys your changes to your docs site, so you
don't need to manage deployments yourself. You can find the link to install on
your [dashboard](https://dashboard.mintlify.com). Once the bot has been
successfully installed, there should be a check mark next to the commit hash
of the repo.
[Commit and push your changes to
Git](https://docs.github.com/en/get-started/using-git/pushing-commits-to-a-remote-repository#about-git-push)
for your changes to update in your docs site. If you push and don't see that
the Github app successfully deployed your changes, you can also manually
update your docs through our [dashboard](https://dashboard.mintlify.com).
## Update your docs
Add content directly in your files with MDX syntax and React components. You can use any of our components, or even build your own.
Add content to your docs with MDX syntax.
Add code directly to your docs with syntax highlighting.
Add images to your docs to make them more engaging.
Add templates to your docs to make them more reusable.